WebAssign Instructor Help
To copy another instructor's course, ask the instructor for the class key.
Before you begin, your LMS administrator must have set up the Cengage tool in your LMS, and you must have received an email from Cengage containing a Cengage Course URL.
Open your LMS course.
Follow the steps for your LMS to access the Cengage tool.
Confirm the Lessons tool is enabled.
Select Site Info from your navigation.
Click Manage Tools.
Scroll down to confirm that Lessons is selected.
Select Lessons from your navigation.
Click Add Content › Add Learning App.
Click the Cengage tool.
If the tool is not available, contact your administrator.
Create a link to the Cengage tool.
You only have to do this once.
Navigate to your external tools.
Third party content like Cengage is listed as an external tool or app in your LMS.
Click the Cengage link.
This might be named Cengage or MindLinks. If you are not sure, ask your LMS admin.
In the URL field, paste the Cengage Course URL from your email.
Click Save.
Click the link you created.
On the Materials tab, click Add Materials › Cengage LMS Integration.
Click
 › Turn editing on.
Click Add an activity or resource.
Select the Cengage tool and click Add.
The Cengage tool is created and named by your Moodle administrator.
Add WebAssign content to your course.
Blackboard Original
Click Content › Build Content › Cengage Content.
If the Cengage tool is not shown under Build Content, see Can't Find Cengage Content in Blackboard.
Blackboard Ultra
Click + › Content Market.
Click Cengage Content under Institution Tools.
If the Cengage tool is not shown under Institution Tools, see Can't Find Cengage Content in Blackboard.
Add the Cengage app to your course navigation if it is not already listed.
The app is copied when you copy a Canvas course.
From the course navigation, click Settings › Navigation.
Drag the Cengage app to the course navigation.
Click Save.
From the course navigation, click Cengage.
If you get an error message when you click Cengage, see the following:
Open the Course Builder tool.
In the Content tab, click Related Tools › Course Builder.
If you have not already done so, create a module in your course.
Drag
 from Build Outline to the course outline.
Alternatively, click
and select the module location.Enter a name for your module, such as WebAssign.
Enter a note for your students.
If the WebAssign component of your course has a different start or end date from your course in Brightspace, enter those dates in Restrictions.
Click Create.
Drag
 from Add Content to your module.
Alternatively, click
and select your module.Open the Cengage integration tool.
If your school uses Google Workspace for Education Plus:
This integration method imports one link at a time. To import multiple links at once, follow the instructions for Google Workspace for Education Fundamentals/Standard.
Open the assignment editor.
If your school uses Google Workspace for Education Fundamentals/Standard:
Click
 ›
›  Cengage.
First time only: Grant Cengage permission to access your LMS.
Click Sign in with Google.
Select the account you use with LMS.
Click Continue.
The permissions Cengage needs to integrate with your LMS are listed.
Click Allow.
Google Workspace for Education Fundamentals/Standard only: Select your LMS class.
Click a class in the Google Classroom Class dropdown list.
Select a LMS topic.
Select whether to import your WebAssign assignments as drafts or immediately assign them to students.
Click Continue.
If prompted, sign in to your Cengage instructor account to link your LMS and Cengage accounts.
If you don't have a Cengage instructor account, click Create Account.
This window might not be shown if your browser does not allow pop-ups for the LMS domain.
On the Integrate with Cengage page, click Select Platform.
On the Select Title page, select the textbook or product to use in your class.
- To search the available content, type a search term.
- To see only WebAssign results, click Platform and select WebAssign.
- To filter the list by license type, click License Type and select Student Purchase Required or Inclusive Access.
Select a product.
Click Continue.
On the Course Option page, select a copy option.
To copy your own course:
Select Copy an existing course.
Your courses for the selected title are listed.
Select the course you want to copy.
Click Continue.
To copy another teacher's course:
Select Copy another instructor's course with a course key.
Enter the course key and click Verify.
Click Continue.
On the Course Details page, specify the course name, dates, and other information for your WebAssign course.
Field
Notes
Course Name
Include the academic term in the course name.
Time Zone
Assignment dates and times are based on the time zone you select.
Course start date
Set the start date to the first day of class. It is the first day students can access your course and the beginning of your students' temporary access period. It cannot be changed after students access the course.
Course end date
To allow your students to view their grades and complete late work, consider setting this 1 week after the last day of class.
Click Finish.
Create a course link or select learning activities to link from LMS.
To create direct links to learning activities:
You can also create a course link with this option.
Click Select Content.
Select activities to include in your class.
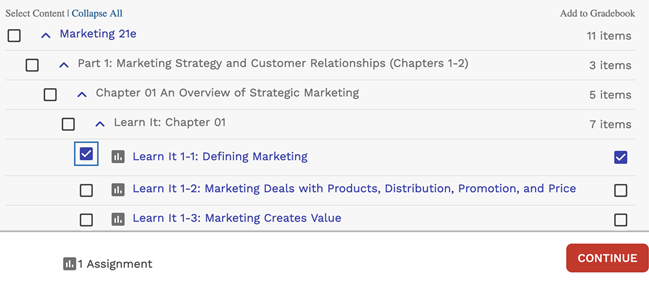
Graded activities that have already been added are marked
 . To avoid duplicate activity links and gradebook columns, do not import the same activity twice.
Due dates set in your WebAssign course are synced to LMS. If your school uses a LMS Partner integration, available dates are also synced to LMS.
Date changes in your WebAssign course overwrite dates set in your LMS course. For consistency, make sure your WebAssign and LMS courses are set to the same time zone.
Due dates set in your WebAssign course do not sync to your LMS course.
If needed, change gradebook syncing for specific activities.
By default, when you include a graded activity it is added to the LMS gradebook.
To remove an activity from the gradebook, clear Add to Gradebook.
To sync an activity to the gradebook without creating an activity link, first select Add to Gradebook and then clear the Add to Course checkbox on the left.
To create a course link only:
Click Add Course Link.
Blackboard Original:Review the settings, select where to put your course link, and click Submit.
Click Continue.
Save your changes at the bottom of the page.
Click either Save and return to course or Save and display.
Click the Content tab.
Click the link to your WebAssign course and verify that it's set up how you want.
First time only: Confirm that LMS can access your account.
If prompted, read and accept the service agreement.