Spark School Administrator Help
In an expired course, you can access:
- Gradebook and student takes
- Old tests and assignments
- The Classroom Presentation Tool
- Teacher resources
You cannot create or schedule new assignments. Students can view expired courses, but they cannot submit work after the end date.
To display options for the course, hover over the course.

You cannot delete or edit courses that display ![]() . These courses were created by the Spark administrator for your school.
. These courses were created by the Spark administrator for your school.
Teacher or Student-Led
- Teacher-led
- School-led
- Self-study
Course Key Lookup for Self-Study
- Region
Where are you studying?
- Product
What textbook are you using?
- Level
What level are you studying?
- Course key
Start Again
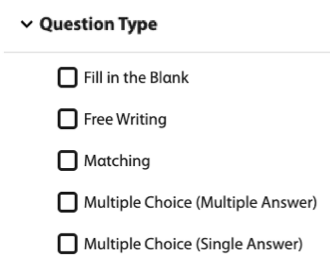
You can filter questions based on the following. Depending on the program you are using, some of these filters may not be available.
- Activity Type (fill in the blank, multiple choice, etc.)
- Auto/Manually Graded
- Unit Number
- Skills and Learning Objectives (grammar, listening, reading, etc.)
- Depth of Knowledge Levels
- Common Core State Standards
- CEFR
- CCRS
- CASAS Competencies
- CASAS Reading
- ELPS
Click Course Management in the top navigation bar.
The list of courses at your institution will display.
Click Courses in Spark.

Complete the required information for your course.
- Course Name
How the course is listed in Spark.
Recommended naming format: Semester, Year, Course, Book (Example: Fall 2026 - ESL 030 - Reflect LS 3).
- Start Date
The first day students can access the course.
- End Date
The last day students can access the course.
- Which online practice activities do you want students to see?
Select whether students can see all the course content and activities or only the content you have assigned.
For the best Spark experience, select Assignments only.
- Additional Information
Optional: Description or notes.
This might include the course section or term.
From the Select Program dropdown menu, choose the National Geographic Learning program you want for your course.
Select additional co-instructors for your course.
Click Add Instructors and select an instructor.
Repeat for each co-instructor.
Click Confirm.
Complete the required information for your course.
- Name
How the course is listed in Spark.
Recommended naming format: Semester, Year, Course, Book (Example: Fall 2026 - ESL 030 - Reflect LS 3).
- Start Date
The first day students can access the course.
- End Date
The last day students can access the course.
- Show/Hide All content
Select whether students can see all course content or only the content you have assigned.
For the best Spark experience, select Only show assigned content.
- Additional Information
Optional: Description or notes.
This might include the course section or term.
- Choose Instructor
Select up to four instructors for your course.
Click the language selector menu
 in the upper-right corner to select your preferred language.
Sign in at learn.eltngl.com.
Click Sign in.
Enter your Username and Password.
Click Sign in.
Open your self-registration guide and click the course link.
If you do not have a self-registration guide, go to learn.eltngl.com. You will need your instructor's course key to register.
Click Register.

If prompted, enter your Course Key and click Submit.
Get the course key from your teacher if needed.
In the Course key field, enter your course key.
Get the course key from your teacher.
Enter your Course Key and click Submit.
Look up your self-study course key:
- Region
Where are you studying?
- Product
What textbook are you using?
- Level
What level are you studying?
- Course key
Start Again
Enter your Course Key.
Look up your self-study course key:
- Region
Where are you studying?
- Product
What textbook are you using?
- Level
What level are you studying?
- Course key
Start Again
If prompted, enter your Access Code and click Submit.
If prompted, enter your Access Code.
Open the front cover of your book and scratch off the coating.
Alternatively, you might have an access code that you purchased separately or that was given to you by your teacher.
This step is skipped if you do not need to enter an access code.
Find your access code
- In your book or printed access card
Open the front cover of your book or get your printed access card. Scratch off the coating.

- Online access code
You might also be able to purchase an online access code.
- From your teacher
For some courses, your teacher will give you an access code.
Find your access code
- In your book or printed access card
Open the front cover of your book or get your printed access card. Scratch off the coating.
- Online access code
You might also be able to purchase an online access code.
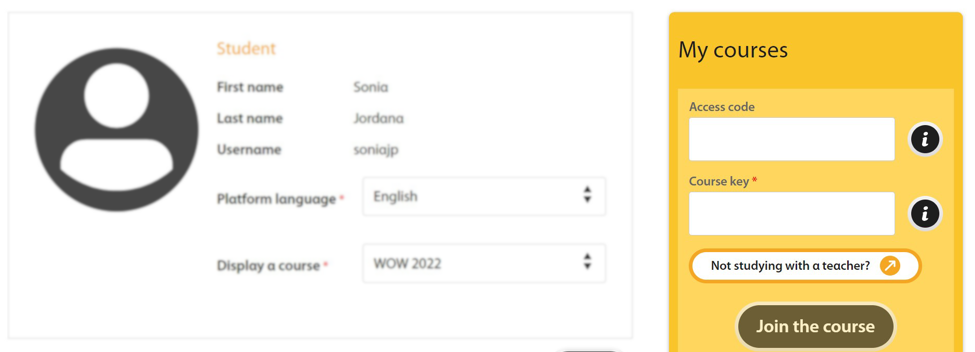
Click Join the course.
Enter your name and email address.
Enter the username and password you want to use.
Usernames can include the following characters:
A B C D E F G H I J K L M N O P Q R S T U V W X Y Z
a b c d e f g h i j k l m n o p q r s t u v w x y z
0 1 2 3 4 5 6 7 8 9
~ ` ! @ # $ % ^ & * ( ) _ - + = { [ } ] | \ : ; " ' < , > . ? /
Select the checkboxes for Terms of Use and Privacy Policy.
Click Register.
Get your course key.
Look up your self-study course key:
- Region
Where are you studying?
- Product
What textbook are you using?
- Level
What level are you studying?
- Course key
Start Again
Click
 › My account at the top-right of the page.
Click the Courses tab in Spark.
In Spark, click Courses.
Click
 to select a course.
Select a course in Spark.
Click User Management.
Click Existing Users +.
Click the All Roles dropdown menu and select Students.
Click the All Roles dropdown menu and select Instructors.
Click the All Roles dropdown menu and select Administrators.
In the Search field, enter the first few letters of the student's name, username, or email address.
A list of matching students displays.
In the Search field, enter the first few letters of the instructor's name, username, or email address.
A list of matching instructors displays.
In the Search field, enter the first few letters of the administrator's name, username, or email address.
A list of matching administrators displays.
Scroll to the student you want and click Add.
The student is added to your course.
Scroll to the instructor you want and click Add.
The instructor is added to your course.
Scroll to the administrator you want and click Add.
The administrator is added to your course.
Click User Management in Spark.
Click New Student.
Click Download CSV template.
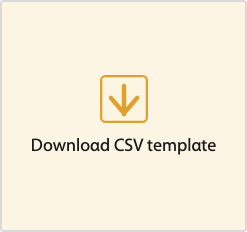
A.CSV template will download on your computer.
Open the template in a spreadsheet editing program such as Excel.
Save your spreadsheet as a.CSV file.
Upload the file you just saved by dragging it to Drop CSV file to upload or clicking browse and selecting your file.


A message is shown in your Messages tab after each roster upload. It contains information about the created accounts or any errors.

- First Name
User's given name.
- Last Name
User's family name.
Optional: An email address where Spark can send the user a link to set their password, or verify their identity if they forget their password.
- Role
Select either Student or Instructor.
- Username
The username for the account.
Usernames can include the following characters:
A B C D E F G H I J K L M N O P Q R S T U V W X Y Z a b c d e f g h i j k l m n o p q r s t u v w x y z 0 1 2 3 4 5 6 7 8 9 ~ ` ! @ # $ % ^ & * ( ) _ - + = { [ } ] | \ : ; " ' < , > . ? /- Password
Select Use the default institution password.
Or, select Send the student, or parent, an email with a link to set their password .
- Password
Select Use the default institution password.
Or, select Send the teacher an email with a link to set their password.
- Upload an avatar
Optional: Upload an image that will appear with the user's account.
To let users upload or change their own avatars, turn on
 Allow upload/edit avatar.
- Join Course(s)
Select the course you want to add the student to.
For the Online Placement Test, select General Online Placement Test.
- Course Key
Your course's 8-digit identification code.
- Enter Access Code
Optional: A 10-digit code that verifies a student may access Spark materials.
You can leave this column blank, and let your students enter their access code when they sign in to Spark.
Hover over the user you want to edit.
To filter the user list:
- Search the user's name in Search
Select the user role

The
 and
and  icons are shown.
Hover over the user you want to edit.
To filter the user list:
- Search the user's name in Search
Select the user role

The
and icons are shown.
In Spark, click.
To enable editing, click
 .
.The
button becomes  .
.Click Save.
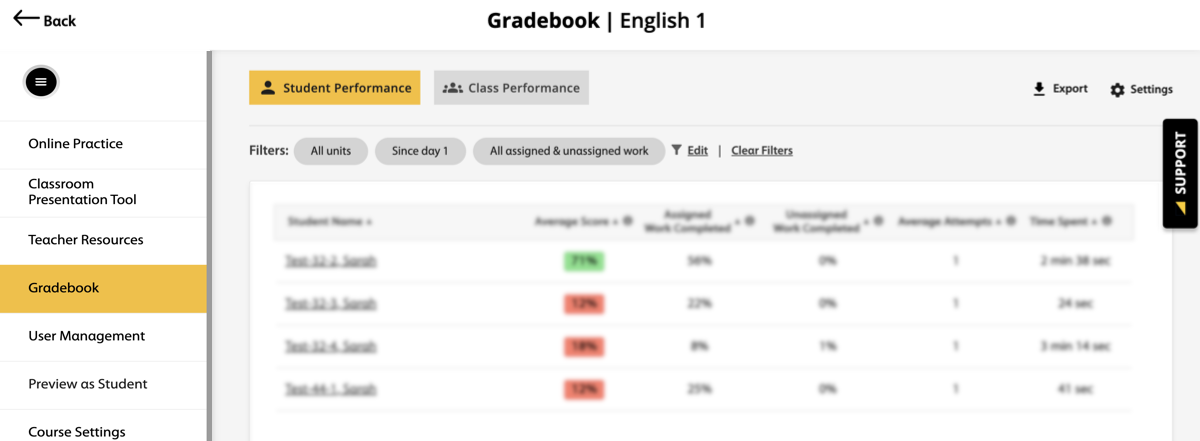
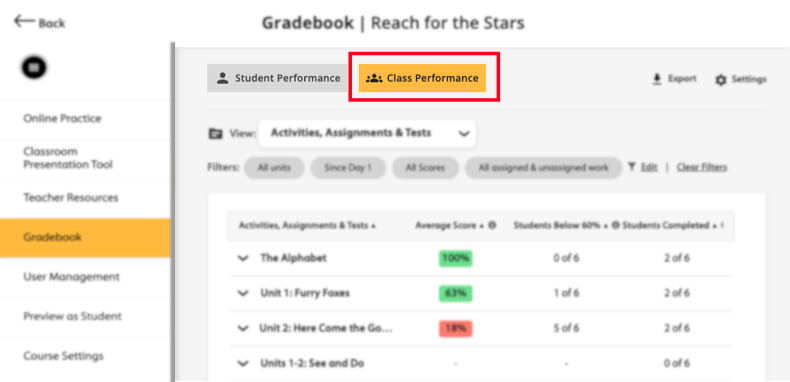
Click Gradebook.
Select your desired performance category option from the View dropdown menu.
Depending on your program, you can select:
- Activities, Assignments, & Tests
- Skills & Learning Objectives
- Common Core State Standards (CCSS)
- CEFR Descriptors
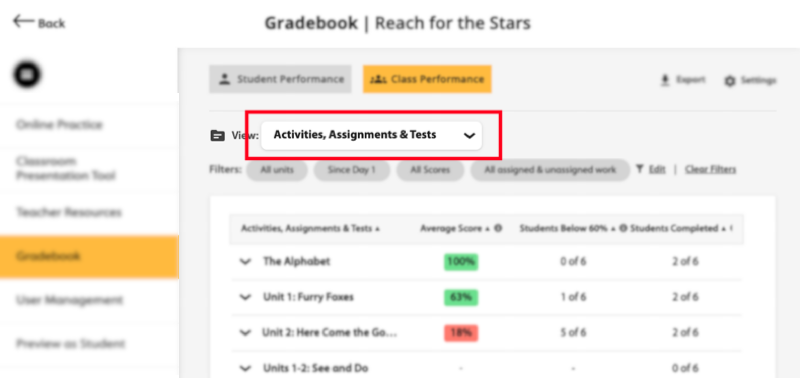
Class performance results will display based on your selection.
Click
 .
.A confirmation message is displayed.
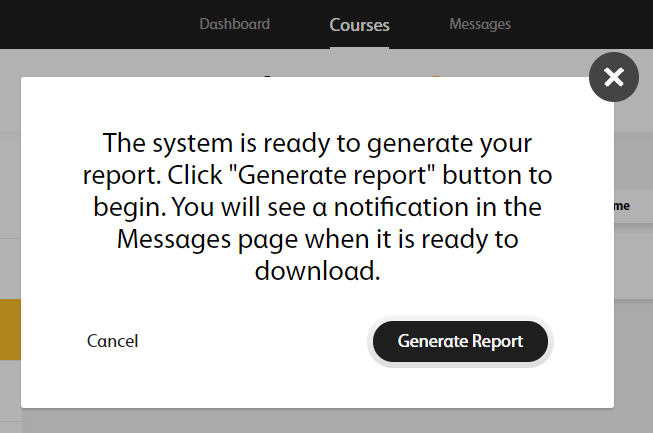
Click Generate Report.
The following message displays.

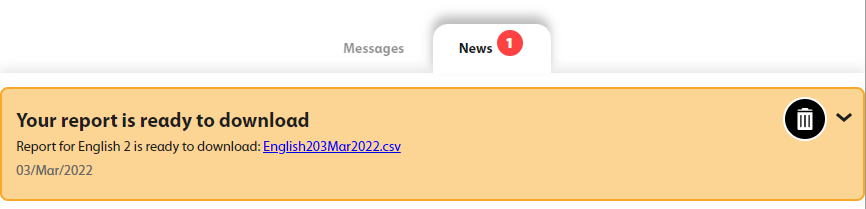
A message will alert you when your report is ready to download.
Click Messages in the top navigation bar.
Click the file link to download the report.
Check your messages to be sure all users were added successfully.
Click the Messages tab.
If your upload had errors, click the Error Report to download a report explaining each error in your original document.
Common errors include not completing required fields or using an existing username.

Correct your.CSV file and import it again.
If your upload was successful, your message does not link to an error report.
Enter the course information.
- Master Course Code
The product code for your institution.
You can find these codes in the Master Course codes.CSV file you downloaded earlier, under column A.
- Course Name
How the course is listed in Spark.
Recommended naming format: Semester, Year, Course, Book (Example: Fall 2026 - ESL 030 - Reflect LS 3).
- Course Key
Leave this field blank. Spark will create a unique identifier for each course when you upload the template file.
- Start Date
The first day students can submit assignments, using the format
dd-MMM-yyyy(Example: 01-JAN-2022).- End Date
The last day students can submit assignments, using the format
dd-MMM-yyyy(Example: 01-JAN-2022).- Additional Information
Optional: Description or notes.
This might include the course section or term.
- Instructor
1-4 Optional: The instructor's username.
Each course can have up to 4 instructors.
- Show All Content (not only assignments)
- FALSE
Students can only access content their instructors have assigned.
- TRUE
Students can access unassigned content for practice.
Usernames can include the following characters:
A B C D E F G H I J K L M N O P Q R S T U V W X Y Z
a b c d e f g h i j k l m n o p q r s t u v w x y z
0 1 2 3 4 5 6 7 8 9
~ ` ! @ # $ % ^ & * ( ) _ - + = { [ } ] | \ : ; " ' < , > . ? /
Click
.Click Reset Password.
Enter your password and click Next.
Create a new temporary password for your student, or send them a link to set their own password.
Create new temporary password
When students sign in with your temporary password, they will be prompted to create a new password.
Select I'll enter a new password myself, then click Next.
Enter the new password in Password and repeat it in Retype password.
The password should contain:
- At least 8 characters
- At least one uppercase letter
- At least one lowercase letter
- At least one number
Click Save.
A message confirms that the password was reset successfully. Click Close and tell your student their new password.
Send password reset link
Select Send the student an email with a link to reset their password, then click Next.
Enter the student's email address and click Send.
If the student account has an associated email address, it is entered here automatically.
A message confirms that the password was reset successfully. Click Close.
Click Tests in Spark.
Click Create a Test +.
In the Test Title field, create a name for your test.
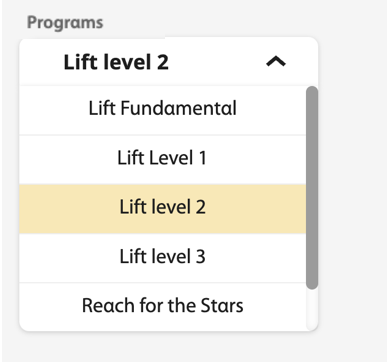
Select your program from the Programs dropdown menu.
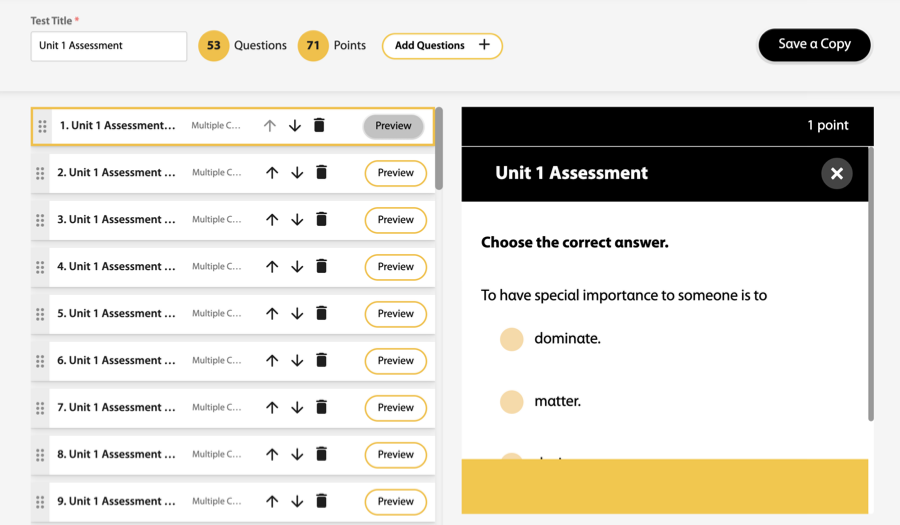
Click Add Questions +.
The filters display on the left-side of the screen, and the test questions display on the right.
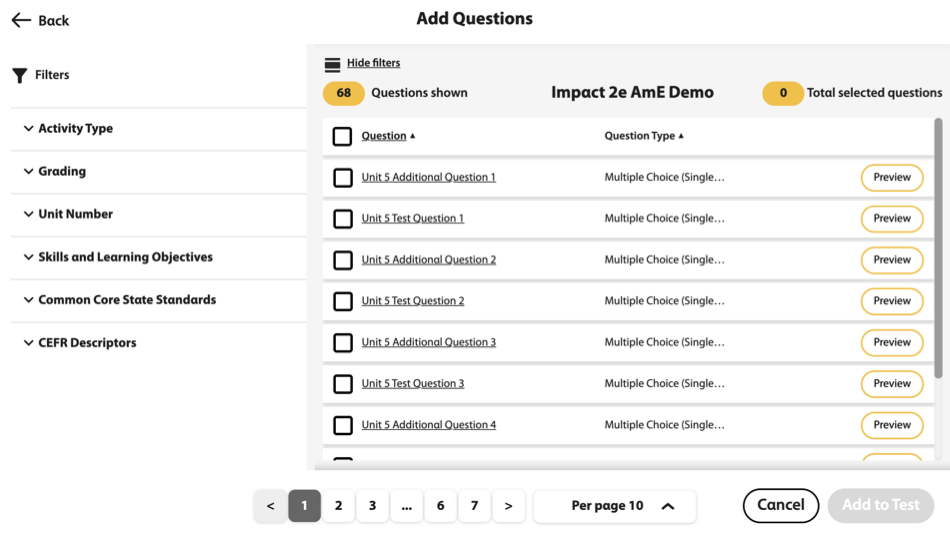
Use the filters to display the types of questions you want for your test.
Click
 next to a question to view it.
Select the questions you want by clicking the box to the left of each question.
Click Add to Test to add the questions to your test.
Your test questions will display in the order they are shown to your students.
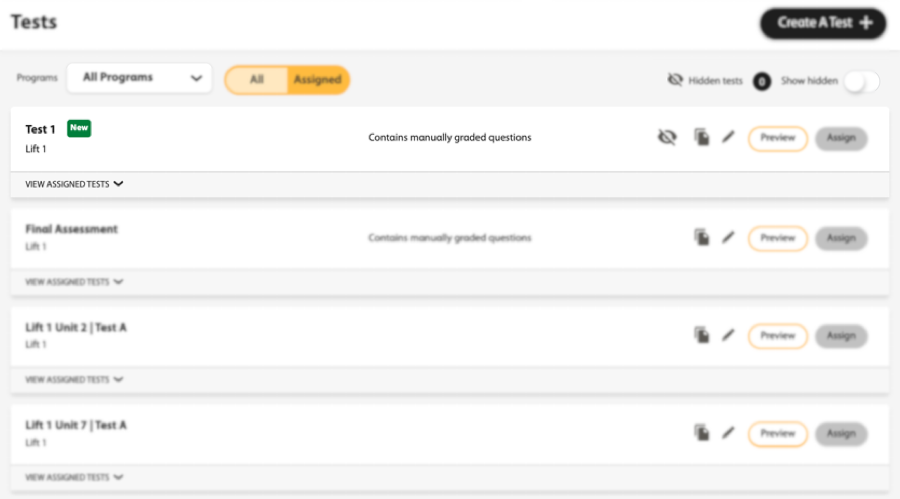
If you teach multiple courses, filter by program using the Products menu.
You can click the VIEW ALL ASSIGNED TESTS tab to only display assigned tests.
When you have added all the questions you want, click Add to Test.
On the left side of the screen, the list of questions is displayed in the order they are shown to students. On the right side of the screen, a preview of each question is displayed.
Edit your test before saving.
Rename your test
Enter a new title in Test Title.
Add a question
Click Add Questions+ and select additional questions.
Preview a question
Click
.Remove a question
Click
.Change the order of questions
Click
 or
or  , or click
  next to a question, drag the question and drop it to the position you want.
Click Save & Close.
Your new test will be listed and indicated by
 .
.
To complete your test, click Save & Close.
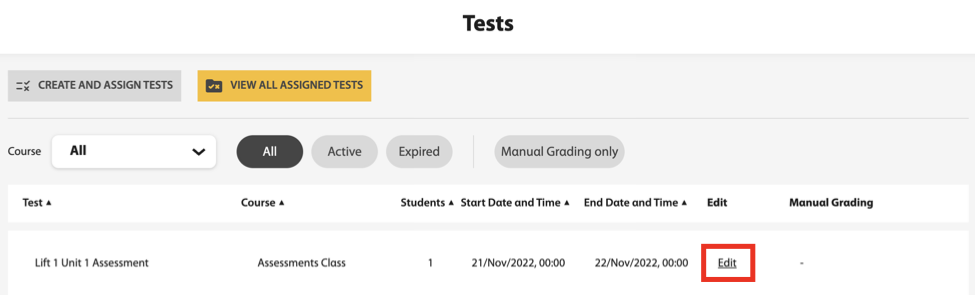
Use the filters to navigate to the test you want.
Click Edit.
Scroll to the test you want and click Assign next to the test name.
Select a course to assign the test to from the Course dropdown menu.
Set a Start Date and Time and End Date and Time for students to take the test.
Click Continue.
Select settings to control test behavior and security, then click Continue.
- Question attempts
How many times students can attempt each question.
- Show correctness marks

- After due date
When students view their test results after the due date, they can see how they did on each question.
- Never
Students are never shown results for individual questions, only their overall test score.
- Show correct answers
- After due date
When students view their test results after the due date, they can see the correct answers to questions they got wrong.
Correctness marks must be enabled to show correct answers.
- Never
Students are never shown the correct answers.
Select Assign to all students, including students that join the course later.
Or, select individual students to take the test.
Click Assign.
Click
 at the bottom-right side of the page to view any additional information.
Click
 to open activities, and
  to open games.
Follow the instructions to complete the activity or game.
Click
 to go to the next question, and
  to go to the previous question.
Click Check Answers after each question to see if you answered it correctly.
Click Done when you complete the activity or game to see your total score.
From the dashboard, select your course.
Click Gradebook.
The Student Performance tab displays.
Click Class Performance.
Click Courses in Spark.
Scroll to the course you want and under the Actions column, click
 .
.
You can do the following after you submit your answers:
- Click
 to exit the activity.
 - If your instructor has allowed for retakes, click
 to try again.