- Open your Moodle course.
-
Click
 > Turn editing on.
- Click Add an activity or resource.
-
Select the Cengage tool and click
Add.
The Cengage tool is created and named by your Moodle administrator.
-
If prompted, sign in to your
Cengage instructor account to link your Moodle and Cengage accounts.
If you don't have a Cengage instructor account, click Create Account.
- On the Integrate with Cengage page, click Select Platform.
-
On the Select Title page, select the textbook or product to use in your class.
- To search the available content, type a search term.
- To see only MindTap results, click Platform and select .
- To filter the list by license type, click License Type and select Student Purchase Required or Inclusive Access.
- Select a product.
- Click Continue.
Note If you don't see your content, contact your Cengage representative. If needed, see cengage.com/repfinder/ https://www.cengage.com/repfinder/postSecondaryEdFacultyCanada/ https://www.cengageasia.com/Contact-Us http://www.cengage.co.in/Rep_Locator https://www.cengage.co.uk/education/contact-us-2/ https://au.cengage.com/repfinder/ https://latinoamerica.cengage.com/contacto/ (Latin America) or https://www.cengage.com.br/contato/ (Brazil). -
On the Course Option page, select Create a new course from scratch.
- Click Continue.
-
On the Course Details page, specify the course name, dates, and other
information for your MindTap course.
Field Notes Course Name Include the academic term in the course name. Time Zone Assignment dates and times are based on the time zone you select.
Course start date Set the start date to the first day of class. It is the first day students can access your course and the beginning of your students' temporary access period. It cannot be changed after students access the course.
Course end date To allow your students to view their grades and complete late work, consider setting this 1 week after the last day of class.
- Click Finish.
-
Create a course link or
select learning activities to link from Moodle.
To create direct links to learning activities:
You can also create a course link with this option.
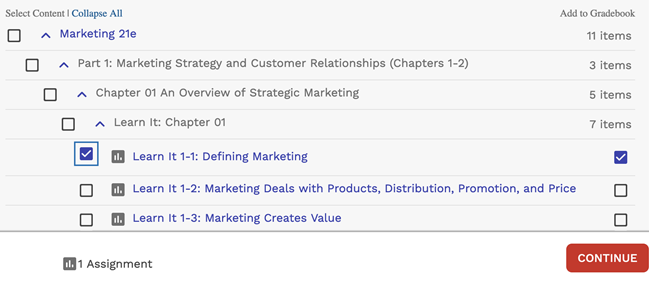
- Click Select Content.
-
Select activities to include in your class.
Note
Selecting a group of activities does not select all activities in the group. You must select each activity individually.
Expand or collapse the course outline if needed.

Graded activities that have already been added are marked
. To avoid duplicate activity links and gradebook columns, do not import the same activity twice.
Due dates set in your MindTap course are synced to Moodle.
Date changes in your MindTap course overwrite dates set in your Moodle course. For consistency, make sure your MindTap and Moodle courses are set to the same time zone.
-
If needed, change gradebook syncing for specific activities.
By default, when you include a graded activity it is added to the Moodle gradebook.
To remove an activity from the gradebook, clear Add to Gradebook.
To sync an activity to the gradebook without creating an activity link, first select Add to Gradebook and then clear the Add to Course checkbox on the left.
Scores sync automatically when assignment attempts are submitted in MindTap and when you enter or edit scores in your MindTap gradebook.
To create a course link only:
- Click Add Course Link.
- Click Continue.
-
Save your changes at the bottom of the page.
Click either Save and return to course or Save and display.
-
Click the link to your MindTap course and verify
that it's set up how you want.
If prompted, read and accept the service agreement.
Create a New Moodle-Integrated MindTap Course
If you have not created the MindTap course you want to
integrate with Moodle™, create it from Moodle.