If your LTI 1.0 LMS is not otherwise specified, the following steps apply to any LTI 1.0 compliant LMS. If you already created the WebAssign course you want to integrate with LMS — and no students are enrolled — integrate your existing course.
Before you begin, your LMS administrator must have set up the Cengage tool in your LMS, and you must have received an email from Cengage containing a Cengage Course URL.
-
Create a link to the Cengage tool.
You only have to do this once.
-
Navigate to your external tools.
Third party content like Cengage is listed as an external tool or app in your LMS.
-
Click the Cengage link.
This might be named
Cengage
orMindLinks
. If you are not sure, ask your LMS admin. - In the URL field, paste the Cengage Course URL from your email.
- Click Save.
-
Navigate to your external tools.
- Click the link you created.
- If prompted, sign in to your Cengage instructor account to link your LMS and Cengage accounts.
- On the Integrate with Cengage page, click Select Platform.
-
On the Select Title page, select the textbook or product to use in your class.
- To search the available content, type a search term.
- To see only WebAssign results, click Platform and select WebAssign.
- To filter the list by license type, click License Type and select Student Purchase Required or Inclusive Access.
- Select a product.
- Click Continue.
Note If you don't see your content, contact your Cengage representative. If needed, see cengage.com/repfinder/ https://www.cengage.com/repfinder/postSecondaryEdFacultyCanada/ https://www.cengageasia.com/Contact-Us http://www.cengage.co.in/Rep_Locator https://www.cengage.co.uk/education/contact-us-2/ https://au.cengage.com/repfinder/ https://latinoamerica.cengage.com/contacto/ (Latin America) or https://www.cengage.com.br/contato/ (Brazil). -
On the Course Option page, select Link to a course that was already created.
Your unlinked courses with no student enrollments for the selected title are listed.
- Select the course you want to link.
- Click Continue.
-
Create a course link or select learning activities to link from LMS.
To create direct links to learning activities:
You can also create a course link with this option.
- Click Select Content.
-
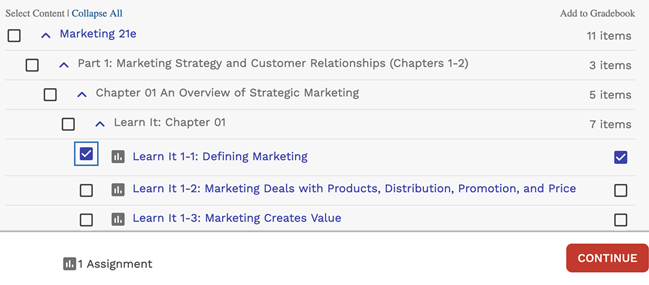
Select activities to include in your class.
Note
Expand or collapse the course outline if needed.

Graded activities that have already been added are marked
. To avoid duplicate activity links and gradebook columns, do not import the same activity twice.
-
If needed, change gradebook syncing for specific activities.
By default, when you include a graded activity it is added to the LMS gradebook.
To remove an activity from the gradebook, clear Add to Gradebook.
To sync an activity to the gradebook without creating an activity link, first select Add to Gradebook and then clear the Add to Course checkbox on the left.
To create a course link only:
- Click Add Course Link.
-
Click the link to your WebAssign course and verify
that it's set up how you want.
If prompted, read and accept the service agreement.