If you already created the WebAssign course you want to integrate with LMS — and no students are enrolled — integrate your existing course.
The following procedure is for LTI Advantage integrations. If the Cengage link in your course navigation works, see LTI 1.0.
- Open your LMS course.
- Click Modules in the course navigation.
-
Locate or create the module that will contain your course link.
The Cengage tool might not be available in both of the following locations depending on your Canvas admin's settings.
To create a course link in a new module:
-
Click
 next to +Module.

- Click the Cengage tool.
To add a course link to an existing module:
-
Locate the module and click
 .
.
- Set the dropdown to External Tool.
-
Click the Cengage LTI Advantage tool.
Look for
 to confirm that the tool is LTI Advantage.
-
Click
- Click the Content tab.
-
If you have not already done so, create a module in your course.
- Click Add a module and enter your module title.
-
In your module, click Add Existing Activities > Cengage.
The Cengage tool may be named differently for your school. Ask your LMS Admin if you are unsure.
If you do not see the Cengage tool, try this instead.
- Click Related Tools > Course Builder.
- Drag
 from
Add Content to your module.
-
If prompted, sign in to your
Cengage instructor account to link your LMS and Cengage accounts.
If you don't have a Cengage instructor account, click Create Account.
This window might not be shown if your browser does not allow pop-ups for the LMS domain.
- On the Integrate with Cengage page, click Select Platform.
-
On the Select Title page, select the textbook or product to use in your class.
- To search the available content, type a search term.
- To see only WebAssign results, click Platform and select WebAssign.
- To filter the list by license type, click License Type and select Student Purchase Required or Inclusive Access.
- Select a product.
- Click Continue.
Note If you don't see your content, contact your Cengage representative. If needed, see cengage.com/repfinder/ https://www.cengage.com/repfinder/postSecondaryEdFacultyCanada/ https://www.cengageasia.com/Contact-Us http://www.cengage.co.in/Rep_Locator https://www.cengage.co.uk/education/contact-us-2/ https://au.cengage.com/repfinder/ https://latinoamerica.cengage.com/contacto/ (Latin America) or https://www.cengage.com.br/contato/ (Brazil). -
On the License Type page, select the payment method applicable to your class.
Very often, only one license type is available.
- Click Continue.
-
On the Course Option page, select Link to a course that was already created.
Your unlinked courses with no student enrollments for the selected title are listed.
- Select the course you want to link.
- Click Continue.
-
Create a course link or select learning activities to link from LMS.
To create direct links to learning activities:
You can also create a course link with this option.
- Click Select Content.
-
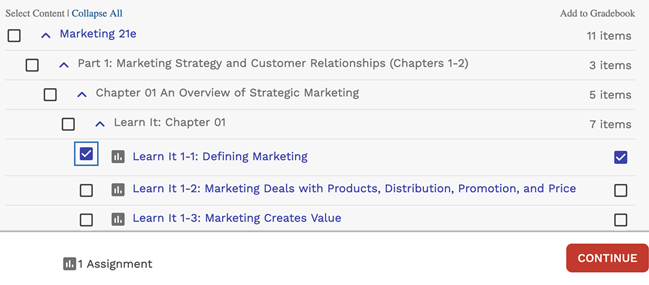
Select activities to include in your class.
Note
Selecting a group of activities does not select all activities in the group. You must select each activity individually.
Expand or collapse the course outline if needed.
If you're using the Google Workspace for Education Fundamentals/Standard workflow, you can select multiple activities.

Graded activities that have already been added are marked
 . To avoid
duplicate activity links and gradebook columns, do not import the same activity
twice.
. To avoid
duplicate activity links and gradebook columns, do not import the same activity
twice.Due dates set in your WebAssign course are synced to LMS. If your school uses a LMS Partner integration, available dates are also synced to LMS.
Date changes in your WebAssign course overwrite dates set in your LMS course. For consistency, make sure your WebAssign and LMS courses are set to the same time zone.
Due dates set in your WebAssign course do not sync to your LMS course.
-
If needed, change gradebook syncing for specific activities.
By default, when you include a graded activity it is added to the LMS gradebook.
To remove an activity from the gradebook, clear Add to Gradebook.
To sync an activity to the gradebook without creating an activity link, first select Add to Gradebook and then clear the Add to Course checkbox on the left.
To create a course link only:
- Click Add Course Link.
- Blackboard Original: Review the settings, select where to put your course link, and click Submit.
-
Click the link to your WebAssign course and verify
that it's set up how you want.
First time only: Confirm that LMS can access your account.
If prompted, read and accept the service agreement.
A link to your WebAssign course is added to your module.